Math Made Easy: Problem of the Day 141
Three dimensional geometry problems can be very difficult to visualize. It can also be quite challenging to produce diagrams for them. While humans live in a three-dimensional world, we still think two-dimensionally far better than we do in three dimensions, and our medium for visual representation is a two dimensional world – pen and paper. But, we can still use a diagram technique to help us with this problem. Very little computation will be needed for solving it.
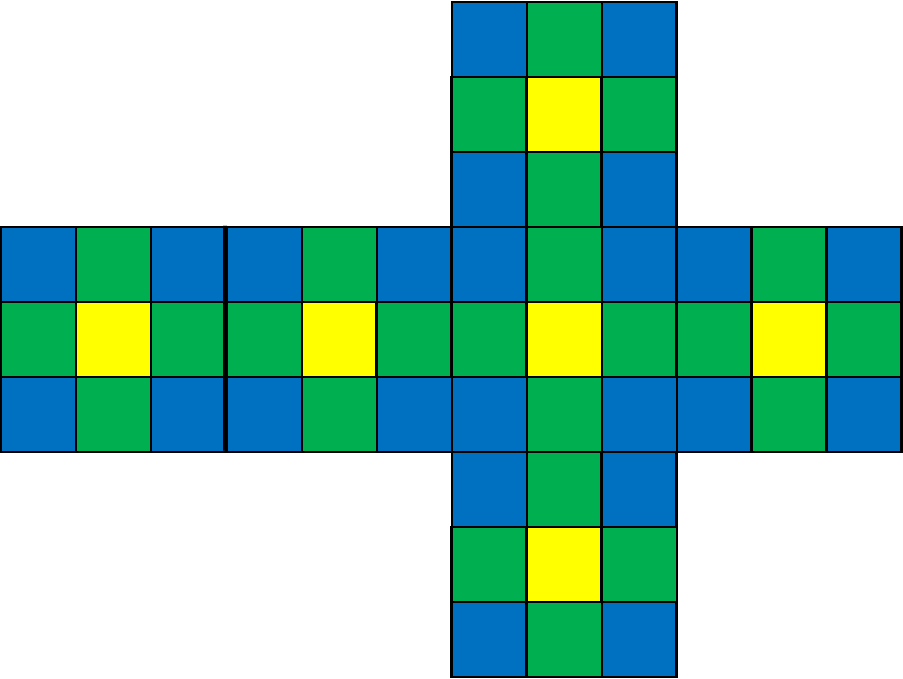
One way we can draw diagrams of three dimensional objects it to unwrap them, so that we’re really only drawing their surface areas. This is the method I chose for today. I first drew the surface of one side, and separated it into 1cm2 squares. Since the bigger square is 3cm to a side, and each little square is 1cm to a side (because the square root of 1 is 1), there will be three squares to each side. I then lined it up with an adjacent side of the cube and repeated. I did this for all six sides, laying it out as if I’d cute the cube open like a pizza box. Note I drew a heavy line so I can distinguish the side that became the “lid” from its adjacent side. We also need to keep in mind that every side touches another side on its edges. That’s important to remember for the next step.

Now we’re going to colour code everything. First, I’ll colour the interior squares yellow. That’s because they don’t touch the edge of their larger square. This means they don’t touch any other sides of the cube. Which means, of the tiny cube of which they’re a part, that side facing outward will be the only side painted. So the yellow squares will represent tiny cubes that only had one side painted.
For small squares that only touch one edge of their larger square, I choose the colour green. This represents tiny cubes that will have paint on two sides. Since they are only on one edge of their square, their cubes will only have surfaces on two sides of the larger cube.
And for the corner squares, I’ll use blue. Those are the cubes that have surfaces on three sides. Pick up a six-sided die and confirm for yourself that anything on a corner will have a surface on three sides of the cube.
Now for the computation. It’s really very simply at this point.
For the tiny cubes that have 3 sides painted, count all the blue squares, then divide by three. Why three? Remember those are corners, so each tiny cube has surfaces on three sides of the larger cube. We don’t want to double-count the cube, so we have to divide by the number of exposed surfaces, which is three. This gives us 8 tiny cubes with paint on three of their sides.
For the tiny cubes with paint on two sides, we count the green squares and divide by two. This uses similar reasoning to the last ones – they have two exposed surfaces, and we don’t want to double count, so we divide by two. This gives us 12 tiny cubes with paint on two of their sides.
For those that have paint on only one side, we simply count the yellow squares and leave it that. We don’t need to divide since they only have one surface exposed.
Now for cubes with no paint. To make sure we don’t miss anything, we subtract the result of the 1, 2, and 3-painted sides cubes from the total number of cubes, which is 27. However many cubes we have left, have no paint on them. That’s because they were in the interior of the larger cube and did not have any exposed surfaces. Lo and behold, only one cube was not exposed, and therefor wasn’t painted.

As for cubes with paint on more than three sides – there are none. Again, check your six-sided die to confirm. It’s impossible for any of those cubes to have more than three surfaces exposed for painting.
|